This seed is a guide to how I built and now publish freewill.dev — using Quartz and Obsidian, in my own way.
Motivation & Why
I’ve always believed that clear writing reflects clear thinking. Writing and sharing my notes helps me learn better by forcing me to test my understanding. Instead of using Medium or Substack, I chose to build freewill.dev as my own space — fully self-hosted, under my control, free from platforms. This seed 🌱 shows how I publish my notes with Quartz and Obsidian.
WHAT is Quartz
References:
Quartz is a fast, batteries-included static-site generator that transforms Markdown content into fully functional websites.
There are other static-site generators like Jekyll and Astro. Compared to Jekyll or Astro, I found Quartz simpler and more Obsidian-native (Obsidian compatibility) — which made it the right choice for me.
Quartz was originally designed as a tool to publish Obsidian vaults as websites. Even as the scope of Quartz has widened over time, it hasn’t lost the ability to seamlessly interoperate with Obsidian.
I like writing notes using Markdown syntax. It’s less distracting, and Obsidian is an excellent tool for authoring these notes.
I publish on freewill.dev because writing is how I learn, and self-hosting is how I stay free — owning my content, my tools, and my platform.
My Publishing Flow
Obsidian (source) → Quartz (Static Site Generator) → Hosting
- Obsidian: author / write content
- Quartz: generate HTML pages from Markdown
- Host: publish the site to the web
Hosting (Quick Note)
For hosting, I use a VPS on Vultr with Caddy as my webserver.
Caddy is lightweight, fast, and automatically handles TLS certificates — one less thing to worry about.
Guide Overview
- Setup Quartz
- Build and run Quartz locally to preview
- Make it Your (Customize Quartz)
- Author content with Obsidian
- Build and deploy your site to a host
Prerequisites
- ✅ Node (v22+) + npm (v10.9.2+) + npx
- 💡 Use
nvm(Node Version Manager) to install/manage Node, npm, npx
- 💡 Use
- ✅ Git installed
- ✅ Basic familiarity with terminal + Git
Verify installation:
node -v
npm -v
Steps
Step 1 - Setup Quartz
1.1 - Clone quartz repo
git clone https://github.com/jackyzha0/quartz frwd_vaultNote: You can name the directory anything. I call mine frwd_vault.
1.2 - Initialize and install dependencies
cd frwd_vault
npm -i
npx quartz create
You’ll be asked:
- Select option to initialize content: I chose empty quartz to start fresh.
- Select how Quartz should resolve links: I chose shortest path, consistent with Obsidian’s “new link format.” You can change this later in quartz.config.ts.
- Content directory: I kept the default content/.
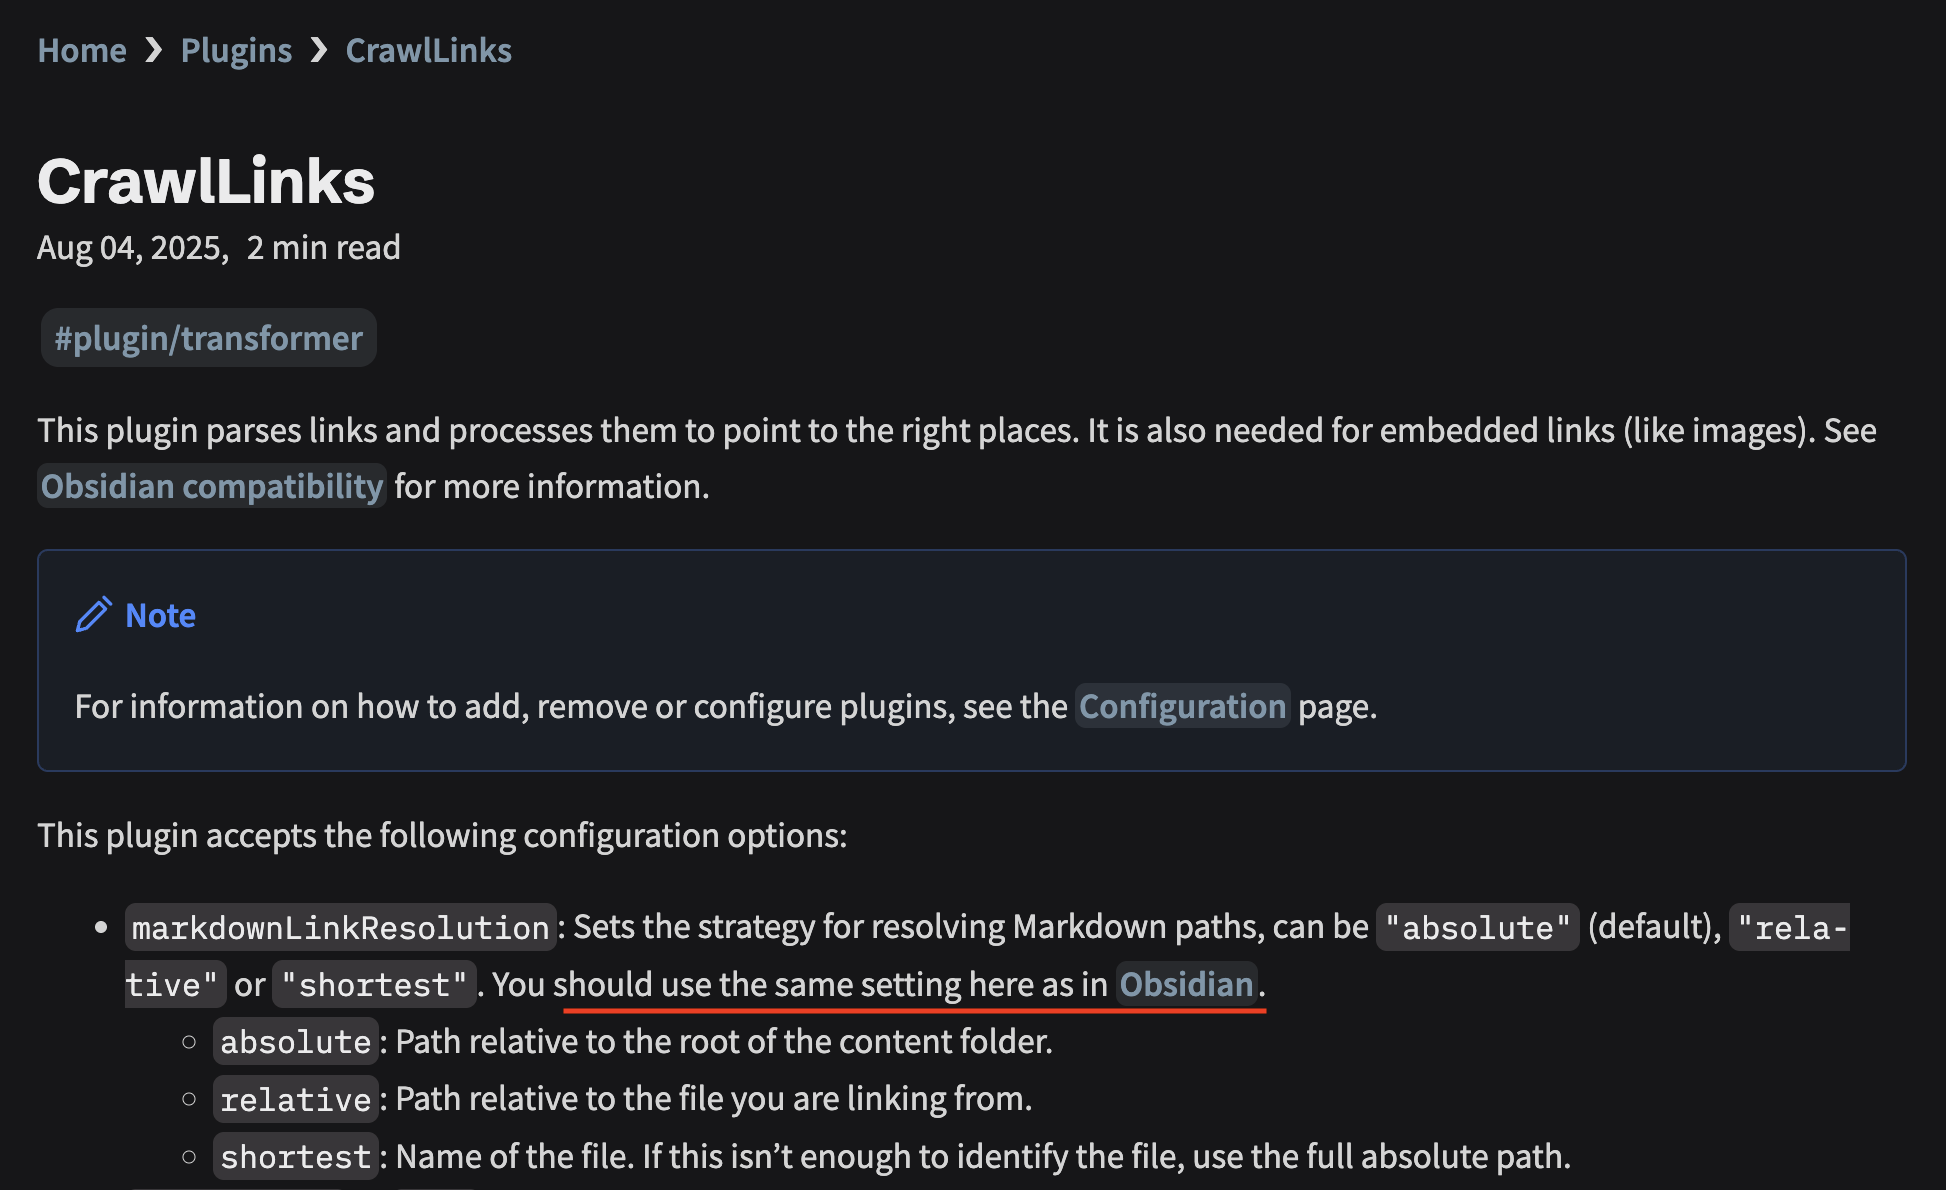
Figure 1 — CrawlLinks plugin: markdownLinkResolution config option
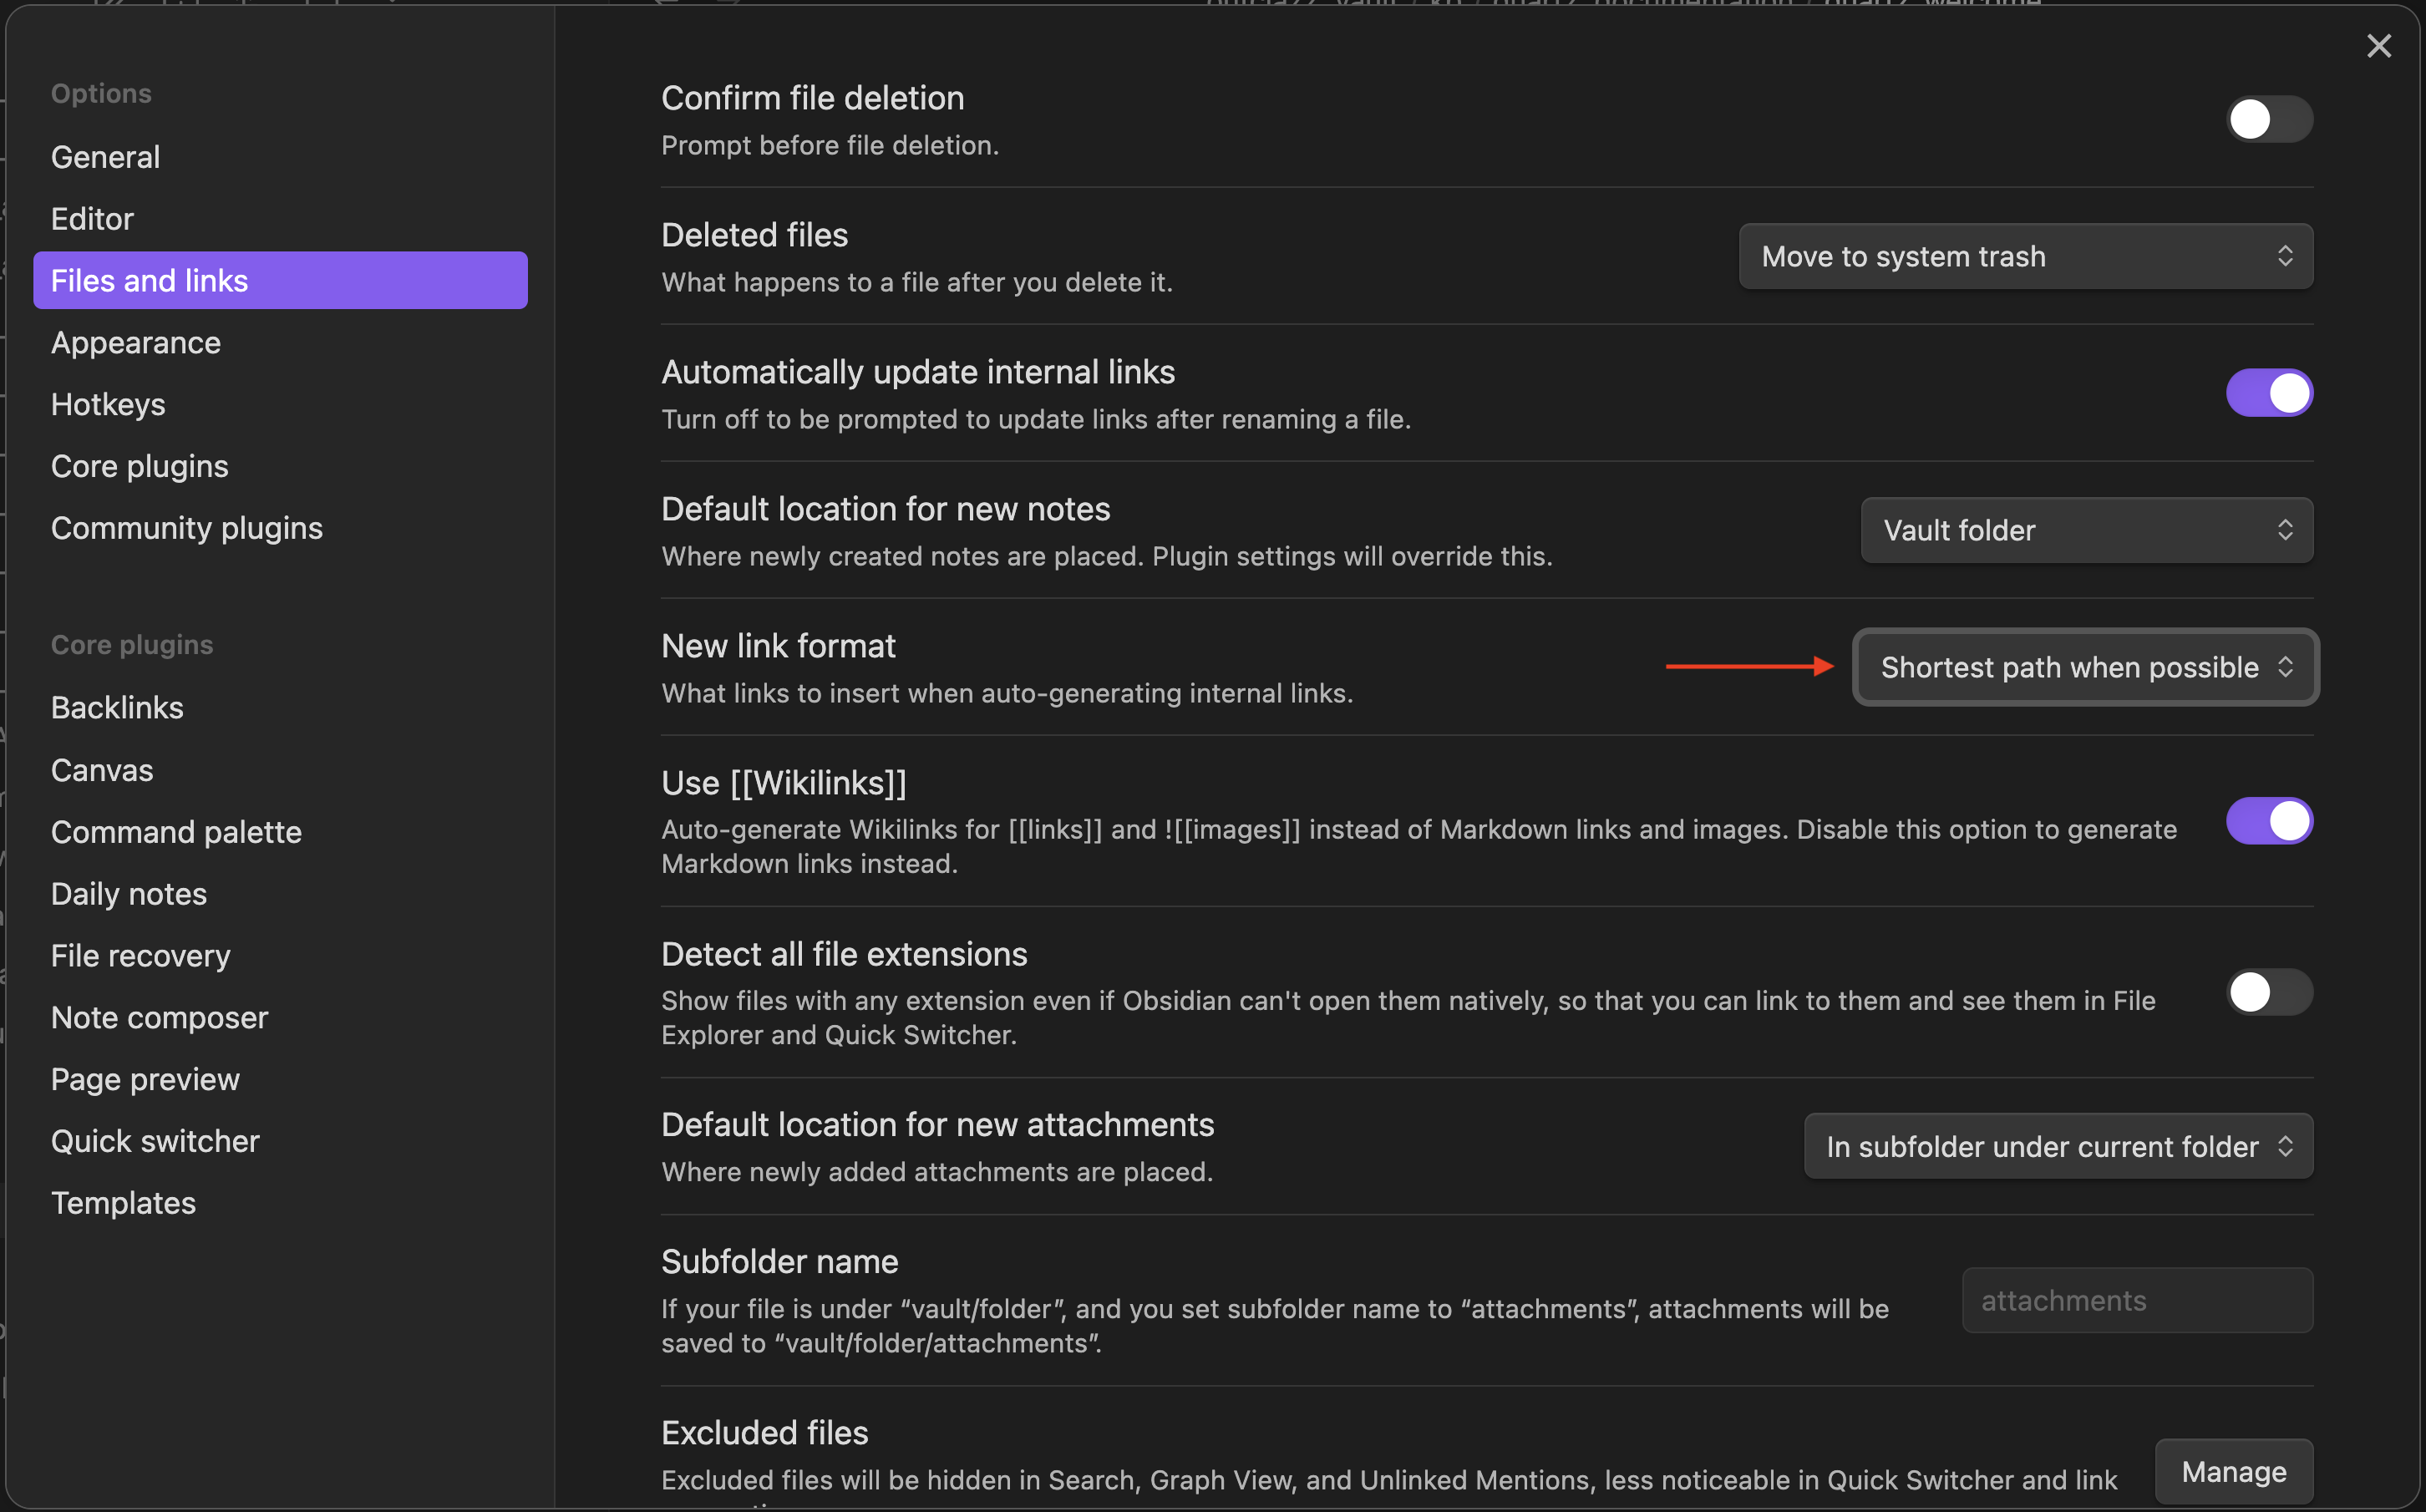
Figure 2 — Obsidian setting: “New link format = Shortest path”
1.3 - Configure Git remotes
git remote rename origin upstream
git remote add origin git@<my-private-repo>

# Verify remotes
git remote -v

# Push Quartz v4 branch to private repo
git push -u origin v4

# Create a main branch and push it
git checkout -b main
git push -f origin main
Step 2 - Build and run Quartz locally to preview
Run commands to build and serve Quartz locally
cd frwd_vault

# Run with default port 8080
npx quartz build --serve

# Or specify custom port 8081
npx quartz build --serve --port 8081
then open internet browser (e.g. Chrome) and open http://localhost:8081/
You should see something as following
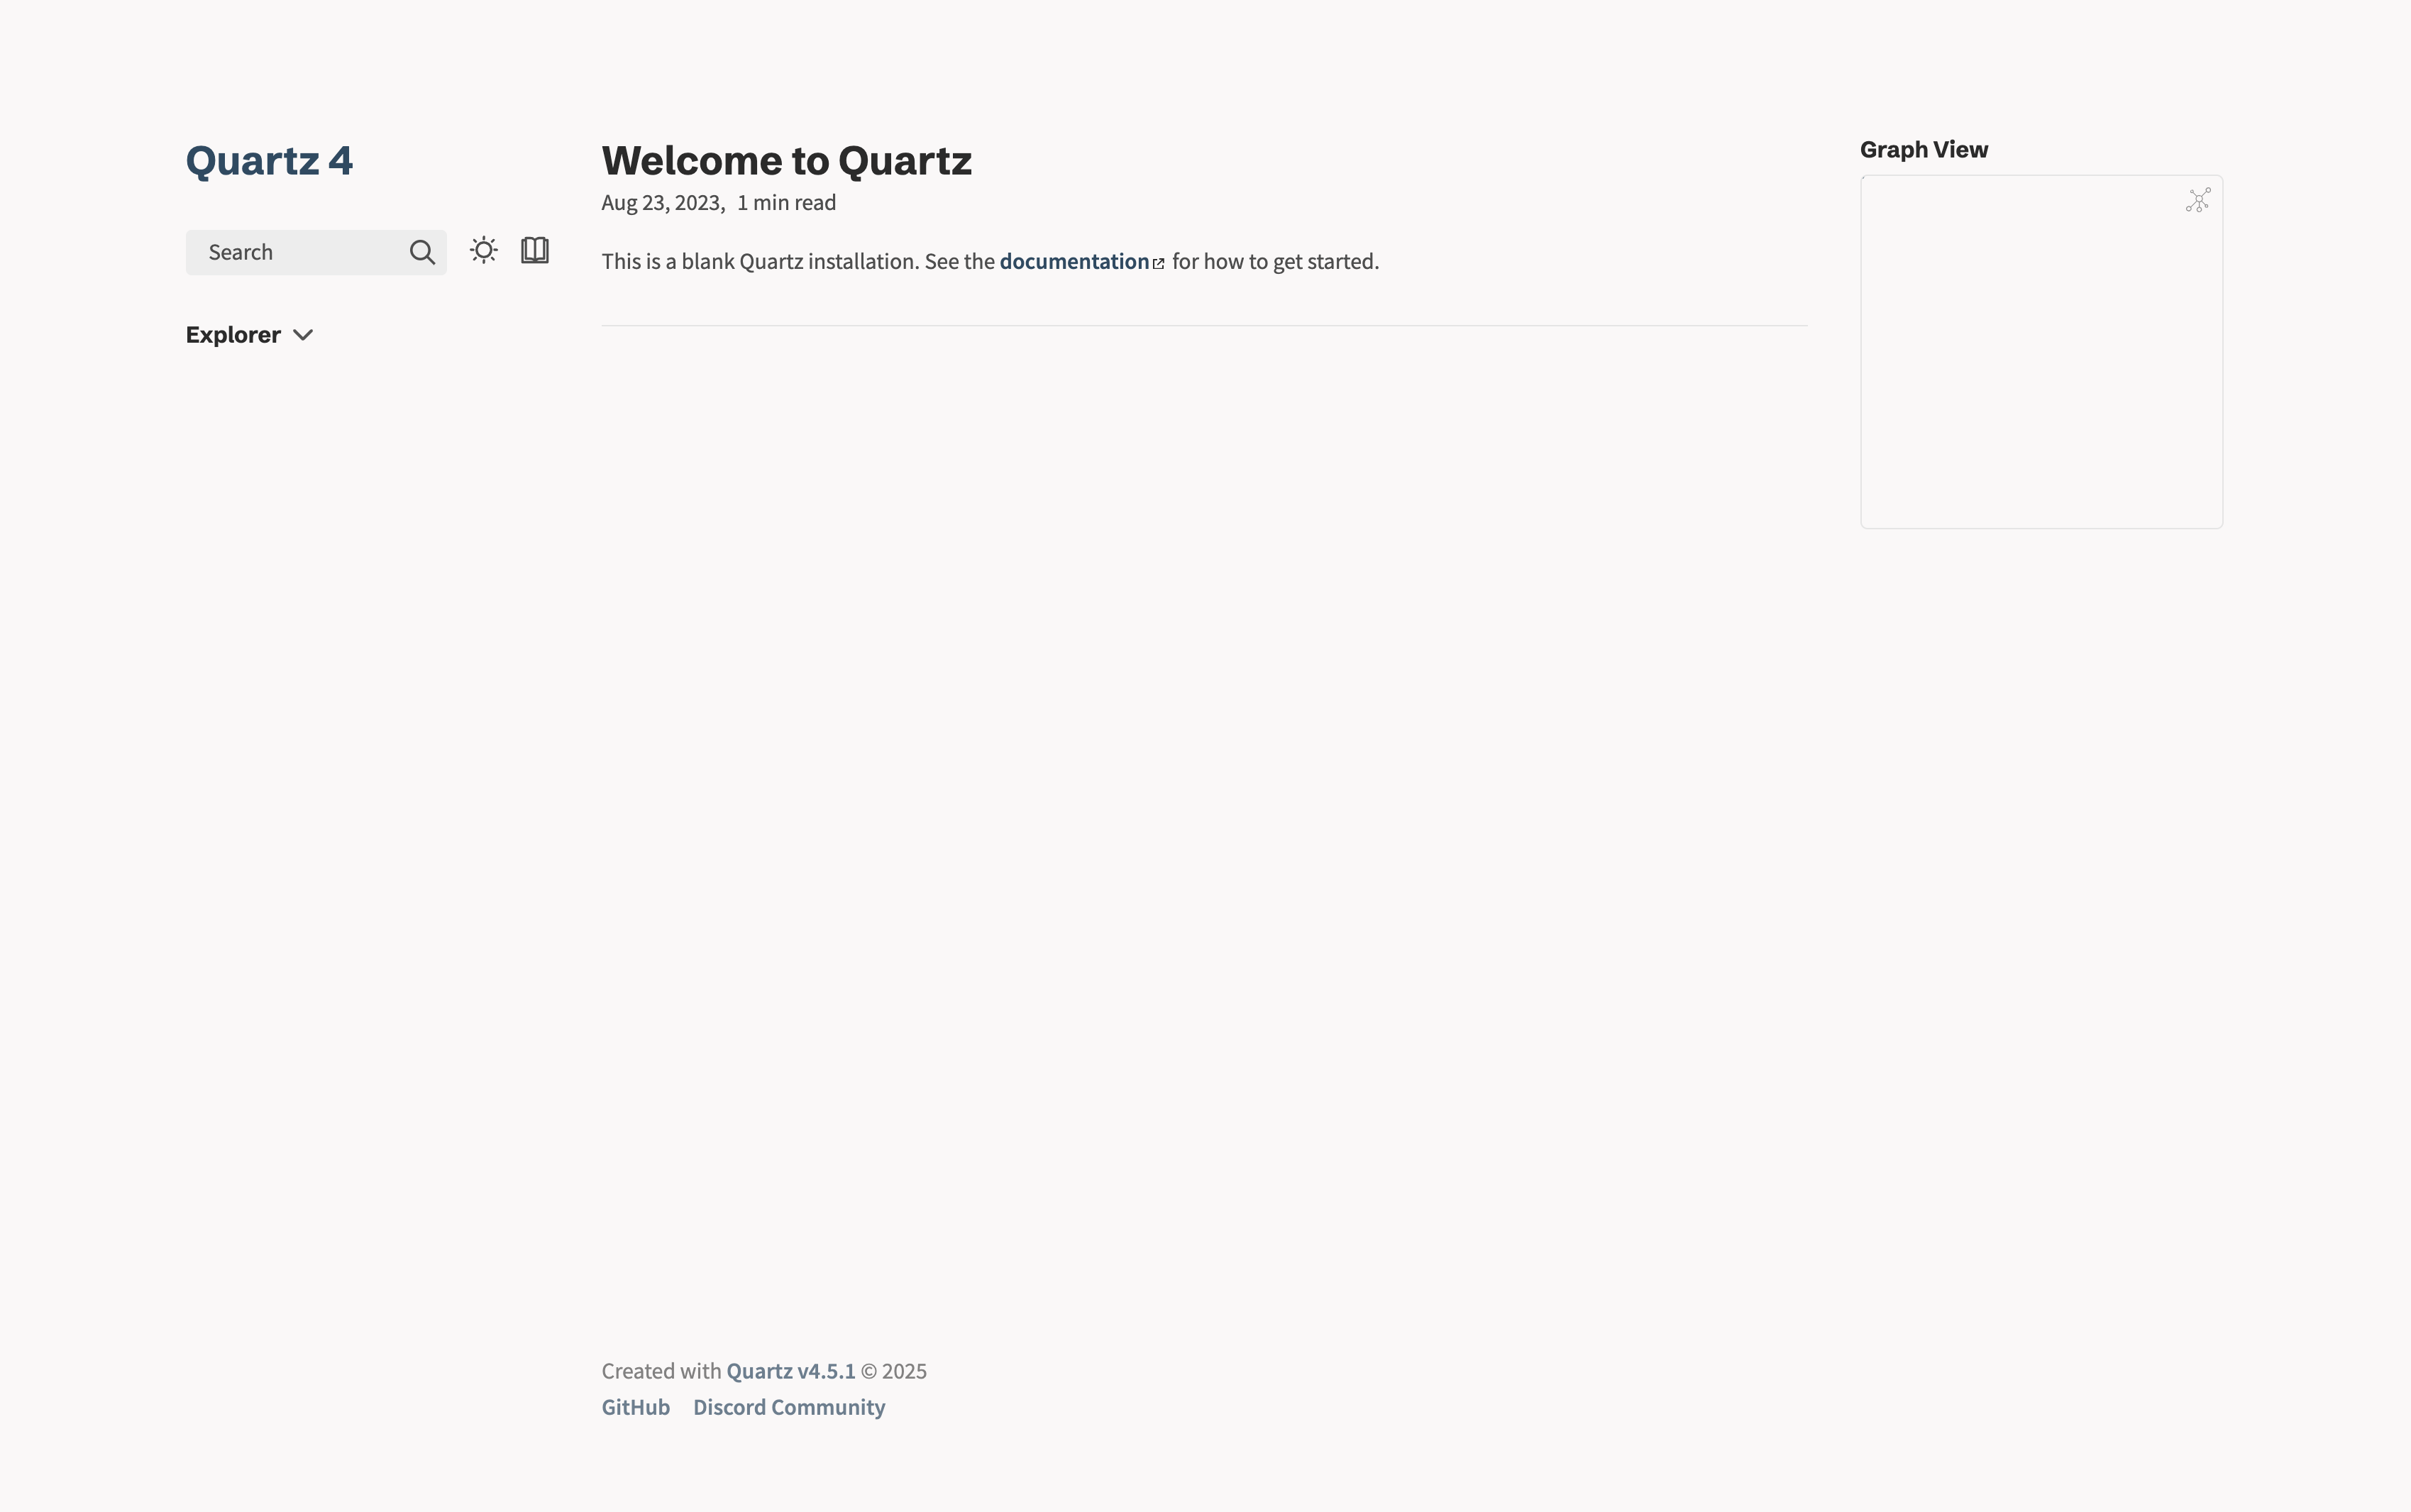
Figure 3 — Website built with Quartz - Default UI
Step 3 - Make it Your (Customize Quartz)
There are a few things I like to customize right away to make the Quartz site feel like mine.
- Change Page Title and baseURL
- Change Footer
- Change page “divider”
Before we customize Quartz, let’s get familiar with Quartz folder structure
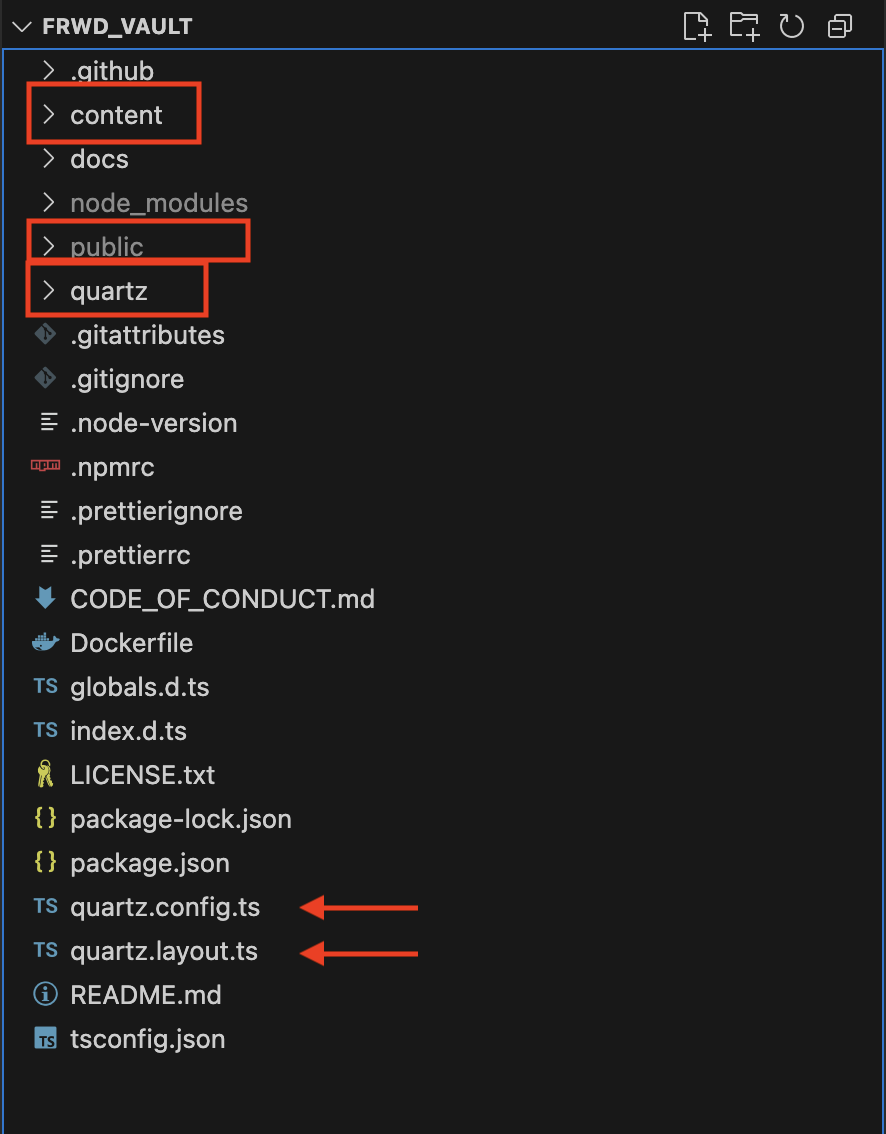
Figure 4 — Quartz folder structure
There are 4 items that we should know
content= this folder is where I put all my “seed” posts (this is the “content” folder that we configured when I initialized Quart - see above)quartz= this folder contains codes of quartzquartz.config.tsquartz.layout.tspublic= this is output folder which I’d upload to my web server for hosting
Now, let’s start modifying Quartz to make it mine :)
Change Page Title and baseURL
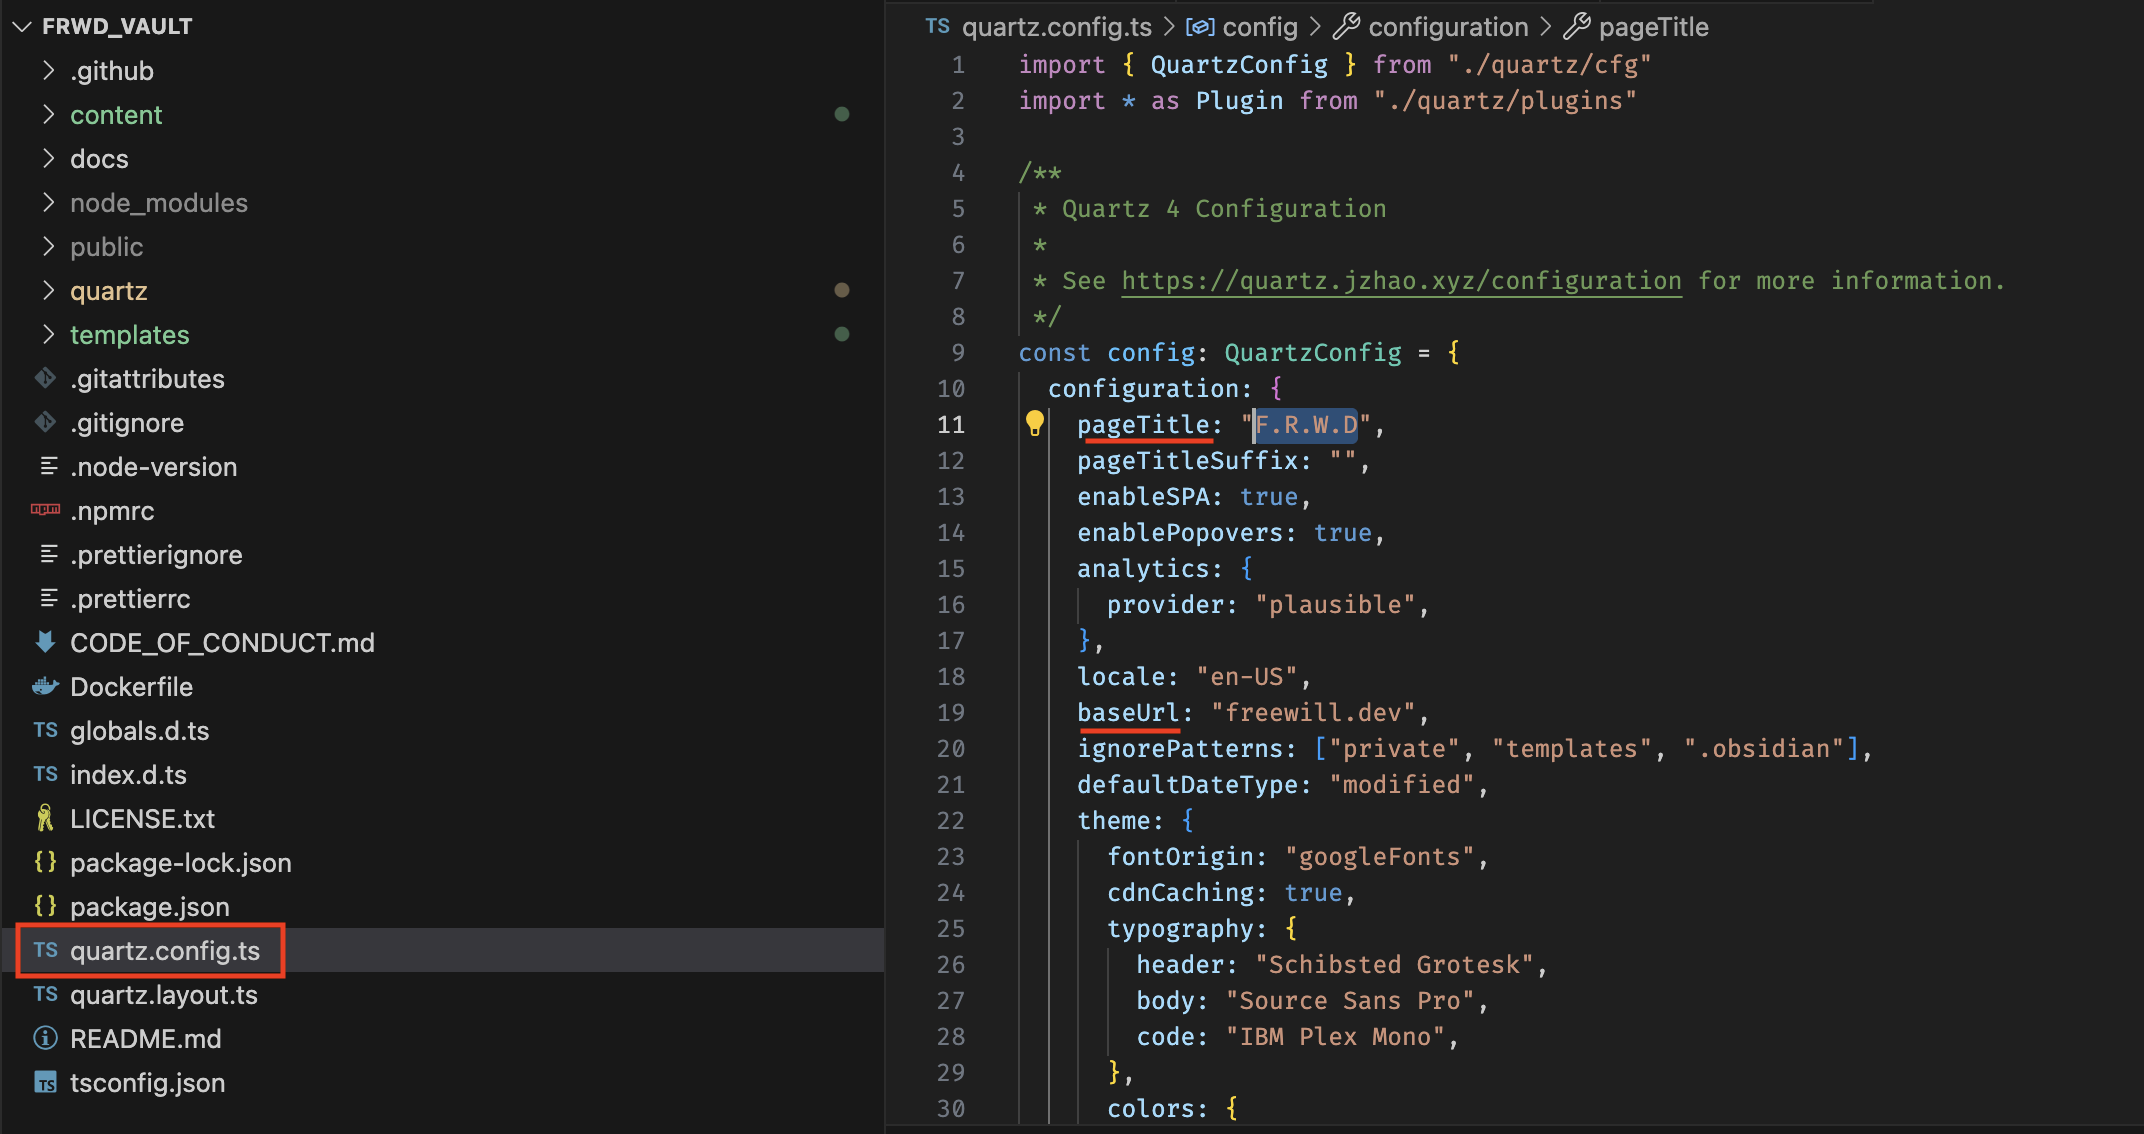
Figure 5 — quartz.config.ts
In quartz.config.ts, there are 2 things I want to change. They are pageTitle and baseUrl.
pageTitle is displayed on top left corner of the page.
Change Footer
For the Footer, there are 2 things I want to change
- Remove Github + Discord Community links from the footer
- Change Footer text
Remove Github + Discord Community links from the footer

Figure 6 — quartz.layout.ts
Footer is rendered by Footer component. This component has “links” property that I can edit in quartz.layout.ts. I can update or remove those links from there.
Change Footer text
To change Footer text, I have to modify the Footer component.
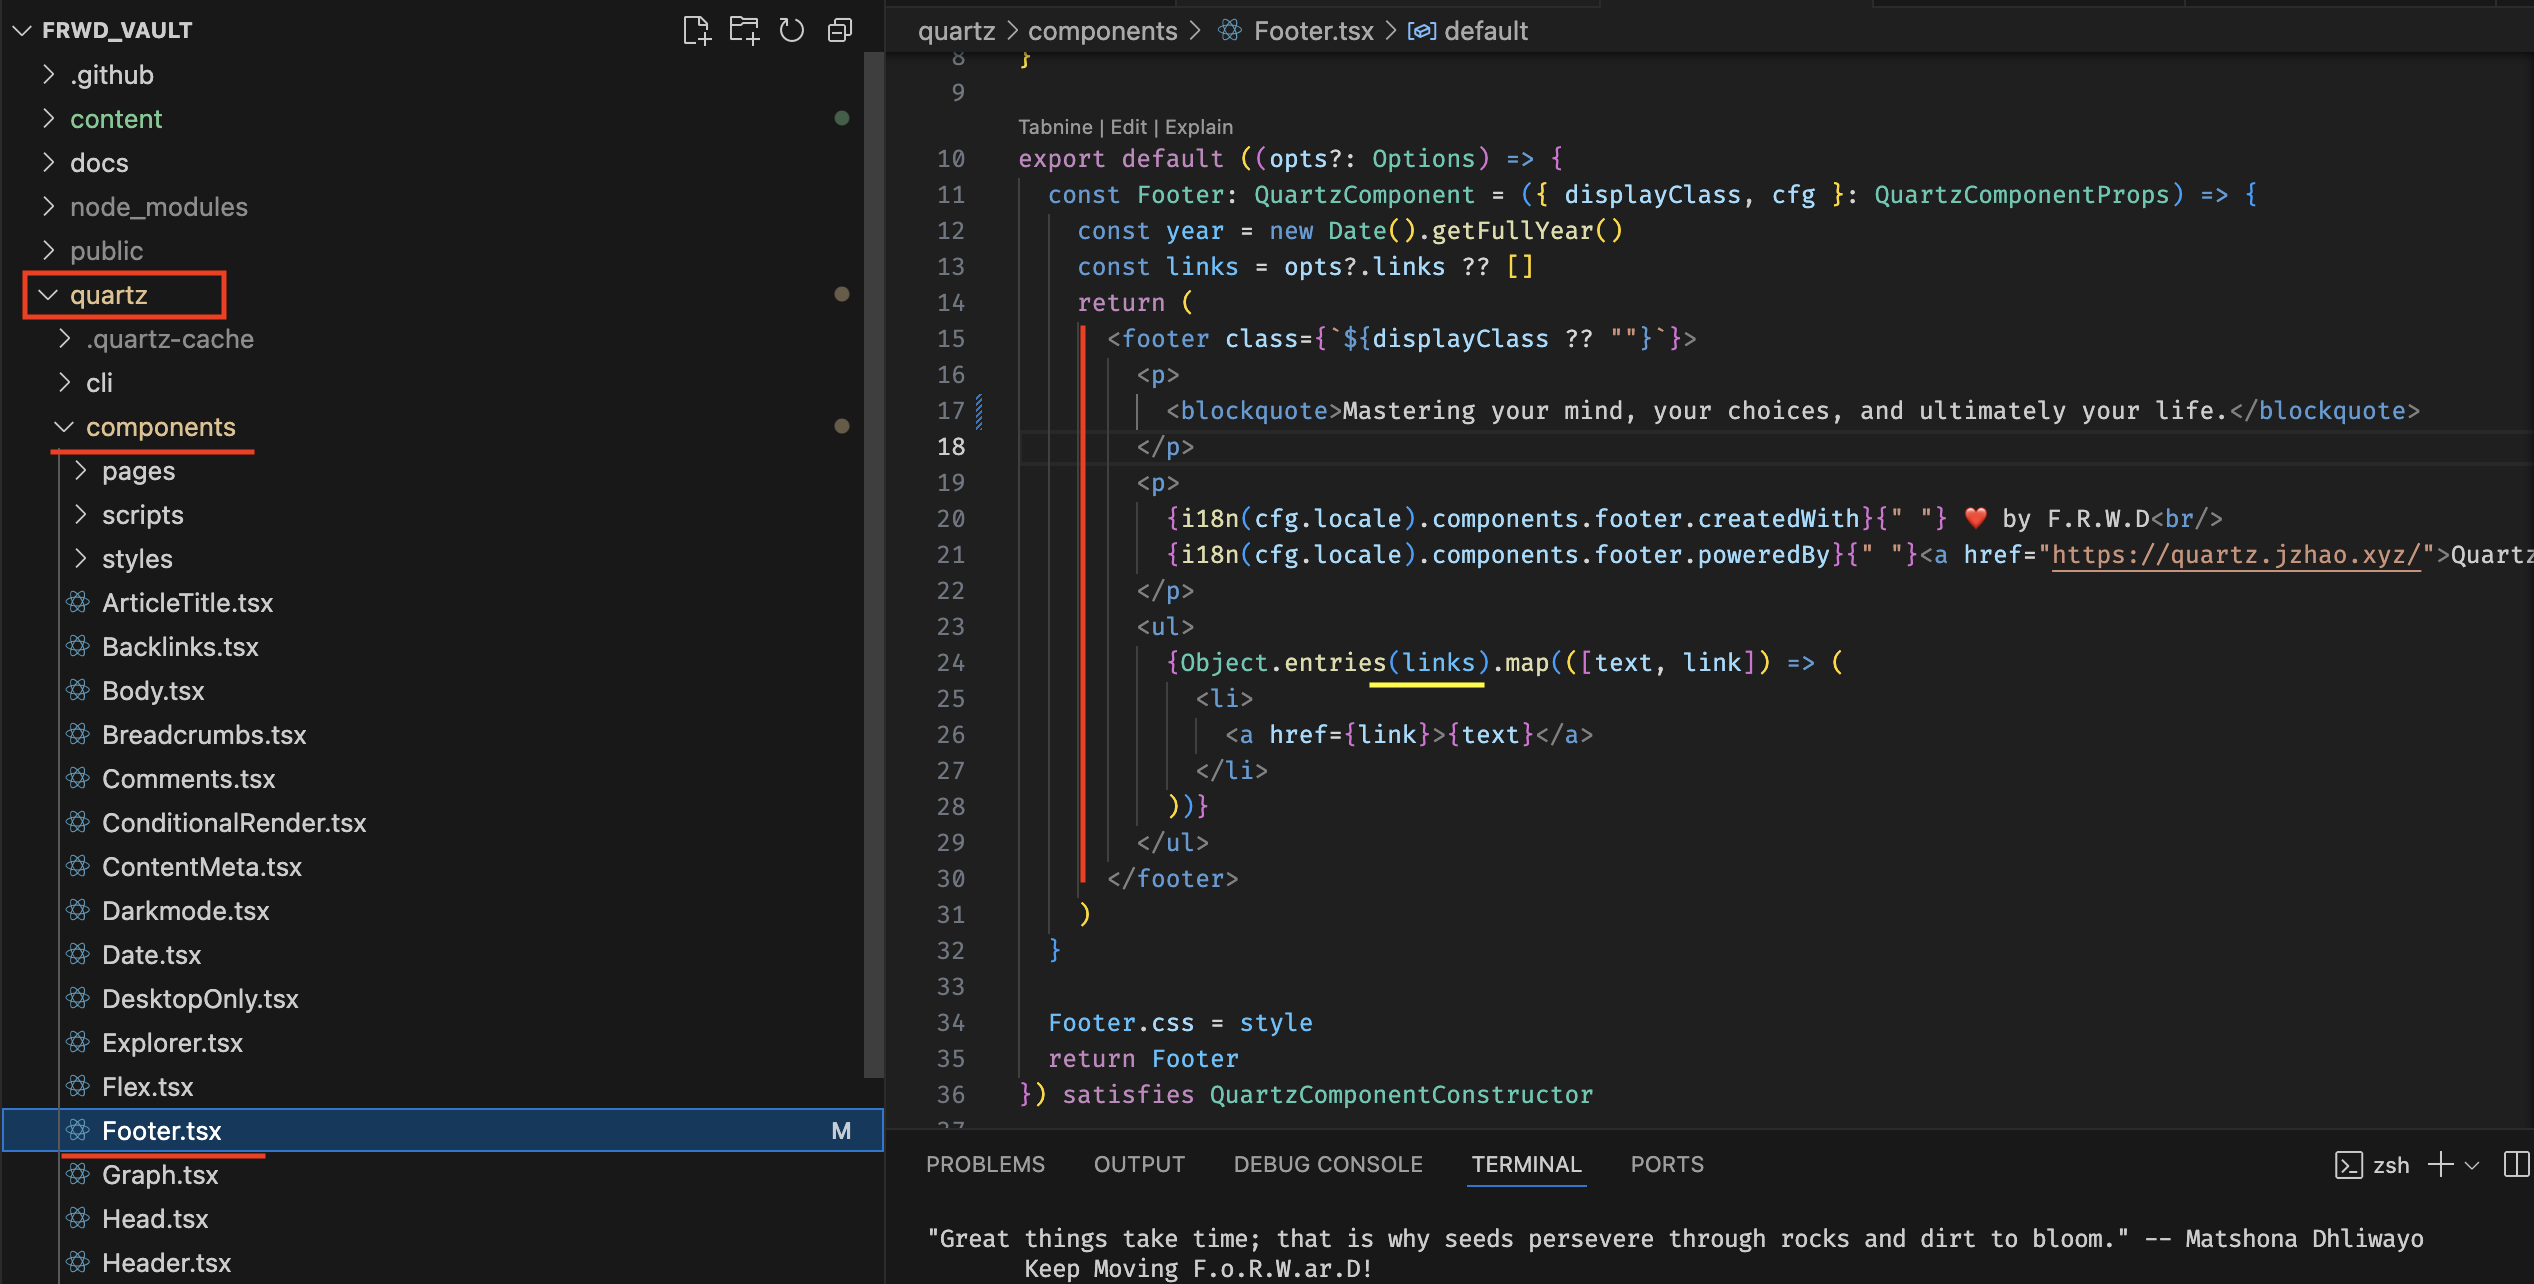
Figure 7 — Footer component
In Footer.tsx, I can change the return block to return the footer that I like. This is just HTML.
Customize page divider
Be default, at the end of a page, Quartz uses <hr> HTML tag as divider.
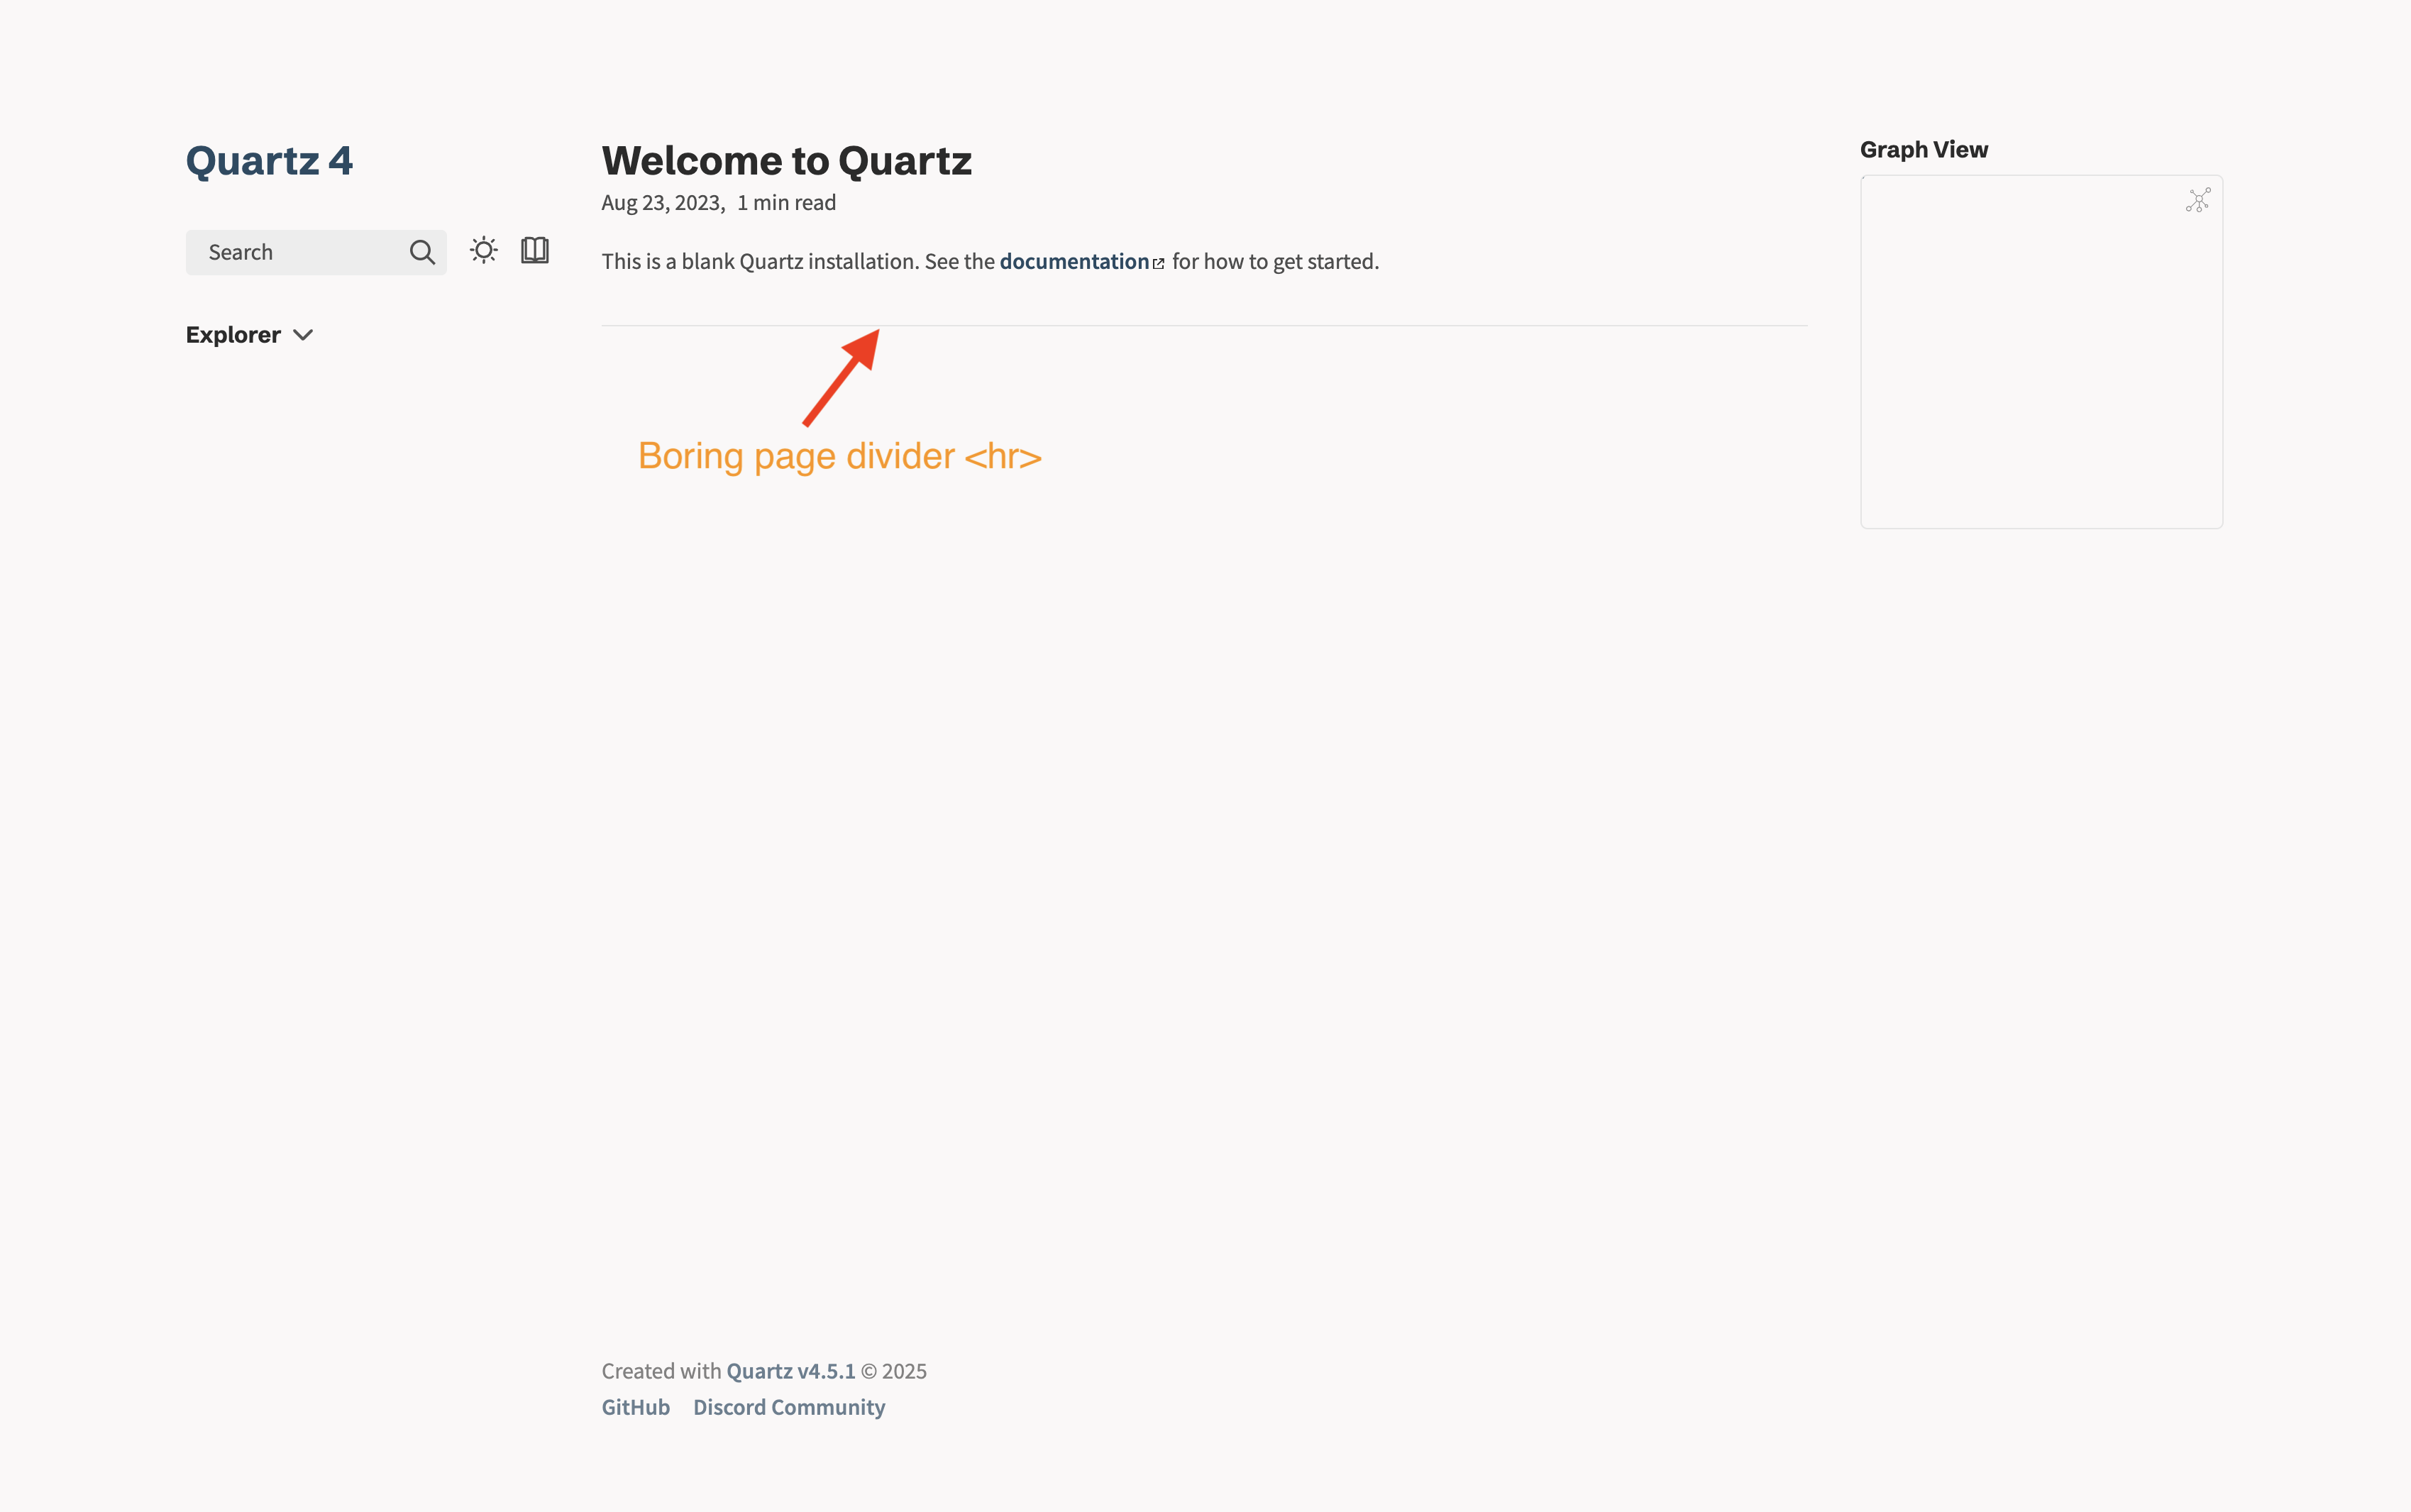
Figure 8 — Quartz - Default divider
This looks kind of boring, and I want to change it.
First, I need to remove this <hr>
Tip
Inside JSX, it’s not allowed to use plain
//or/* ... */directly — you have to wrap comments in{}so the parser treats them as expressions.
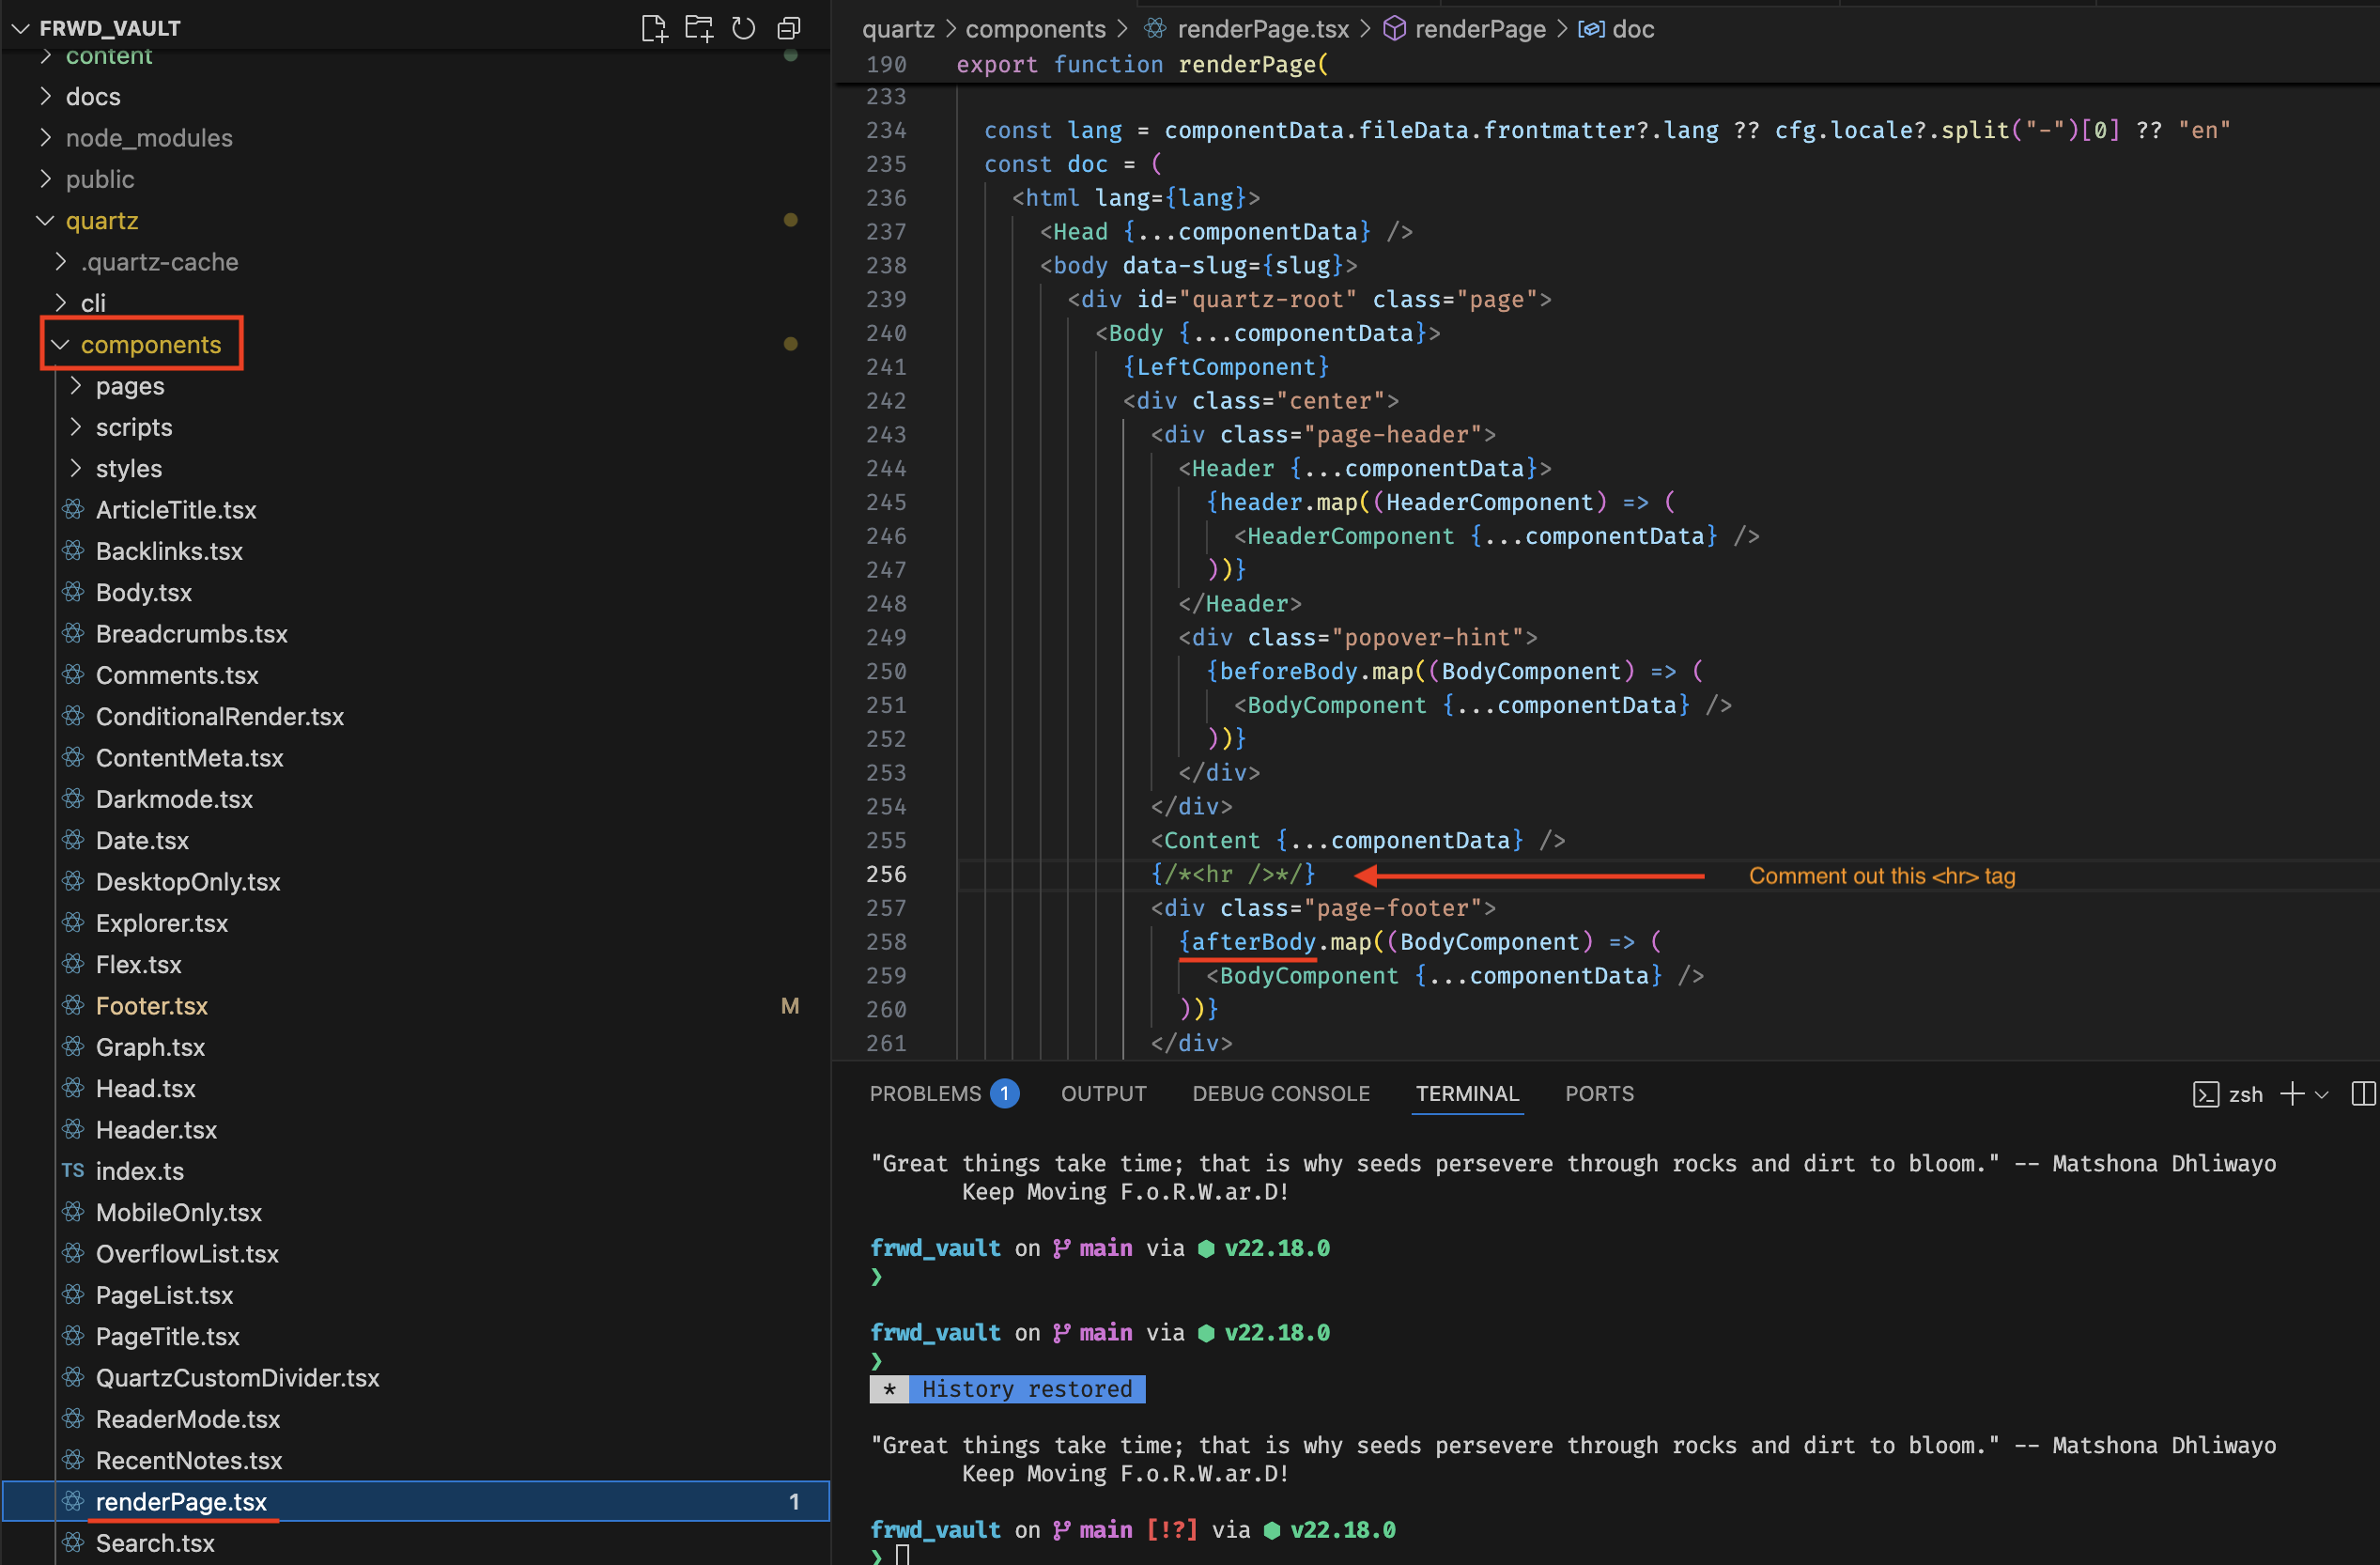
Figure 9 — renderPage component
Then, I implement a custom divider component.
To create a custom component, I create a file in components directory (I call it QuartzCustomDivider.tsx)
// file QuartzCustomDivider.tsx

import { QuartzComponent, QuartzComponentConstructor, QuartzComponentProps } from "./types"

export default (() => {
    const QuartzCustomDivider: QuartzComponent = ({ displayClass }: QuartzComponentProps) => {
      return (
          <div
          className={displayClass}
          style={{
              borderTop: "4px solid",
              borderImage: "linear-gradient(to right, #00c6ff, #0072ff, #00c6ff) 1",
              margin: "20px 0",
          }}
          >
          {/* Add more styling or content here if needed */}
          </div>
      );
    };
    return QuartzCustomDivider;
}) satisfies QuartzComponentConstructor;
Then I need to add import this component and export it in components/index.ts
// other imports ...
import ConditionalRender from "./ConditionalRender"
import QuartzCustomDivider from "./QuartzCustomDivider"

export {
  // ... other exports
  Comments,
  Flex,
  ConditionalRender,
  QuartzCustomDivider
}
Finally, I need to add this QuartzCustomDivider component to afterBody section in quartz.layout.ts
// components shared across all pages
export const sharedPageComponents: SharedLayout = {
  head: Component.Head(),
  header: [],
  afterBody: [
    Component.QuartzCustomDivider(),
  ],
  footer: Component.Footer({
    links: {

    },
  }),
}
That’s it, now I have less boring divider

Figure 10 — Quartz - Custom divider
Step 4 - Author content with Obsidian
With those minimal customization, I have a good-enough looking site, it’s time to start writing content.
And as I mentioned, I’d use Obsidian as my tool of choice for writing content in markdown format.
In Obsidian, I just simply open frwd_vault folder
File>Open Vault...>Open folder as vault
From this point on, I just simply start writing and organizing the content folder to my liking.
Step 5 - Build & Deploy
Once I’ve planted my 1st seed, it’s time to share it with the Universe :)
Prerequisites
- ✅ Webserver + VPS for hosting
- ✅ SSH access to the VPS
Build
First I need to build my site
cd frwd_vault

npx quartz build
Deploy
Then it’s time to deploy it.
Since freewill.dev is all about my freedom journey, I chose to host this site on my own.
To get started, I go with manual deployment using rsync.
From my local laptop, I just simply run following commands
Syncing with rsync
rsync -avz --delete -e "ssh -i /Users/frwd/.ssh/my_ssh_key -p 22" public/ frwd@my_vps_host_ip:/var/www/freewill.dev/html/ --rsync-path="sudo rsync"Fixing permissions
ssh -t <ssh_hostname> 'sudo chown -R caddy:caddy /var/www/freewill.dev/html'Boom 🎉 freewill.dev is LIVE — Welcome to the Universe!
Caveats / Notes
baseUrlshould match your production domain; if it points to prod, local assets that depend on it may not load when previewing.- Link resolution: Quartz link mode can be changed later in
quartz.config.tsif it diverges from Obsidian’s “shortest path”.
Publishing isn’t just technical — it’s planting seeds of knowledge where they can grow in public. 🌱
Credit
- Quartz GitHub: https://github.com/jackyzha0/quartz
- Quartz Documentation: https://quartz.jzhao.xyz/